
In this series we’ll be working through these tutorials on the basics of assembly. We’ll be using the Netwide Assembler (NASM) (https://www.nasm.us/) to write assembly programs on a 32-bit i686 Ubuntu Linux virtual machine.
The goal of this series is to document my journey as I learn how to program in assembly. I’m eager to improve my command over assembly language because I want to learn more about exploit development and low-level programming. Therefore, there may be asides or references to matters related to cyber-security / exploitation throughout the series.
Finally, this series is not completely original and is based directly off the tutorial created by https://asmtutor.com/. Most of the assembly code examples are pulled from that tutorial series.
Now, let’s jump in.
Every assembly program gets broken into three main sections:
The data section is used for “declaring initialized data and constants. The data does not change at runtime,” (tutorialspoint.com). This is significant because the amount of space allocated in the data section cannot be increased at runtime.
The bss section is used for declaring variables.
The text section is where the actual instructions for the program go. This section must begin with the instruction “global _start which tells the kernel where program execution begins,” (tutorialspoint.com).
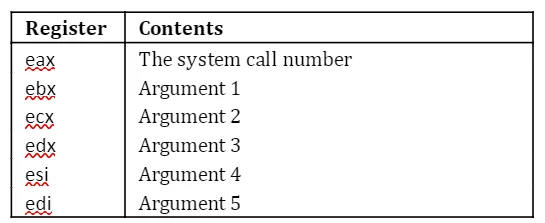
The only interface the programmer has above the actual hardware is the kernel. In order to build useful programs in assembly we have to use the “Linux system calls provided by the kernel,” (asmtutor.com). System calls are implemented as assembly language instructions and are “usually made when a process in user mode requires access to a resource,” (tutorialspoint.com). When you execute a system call a few things happen:
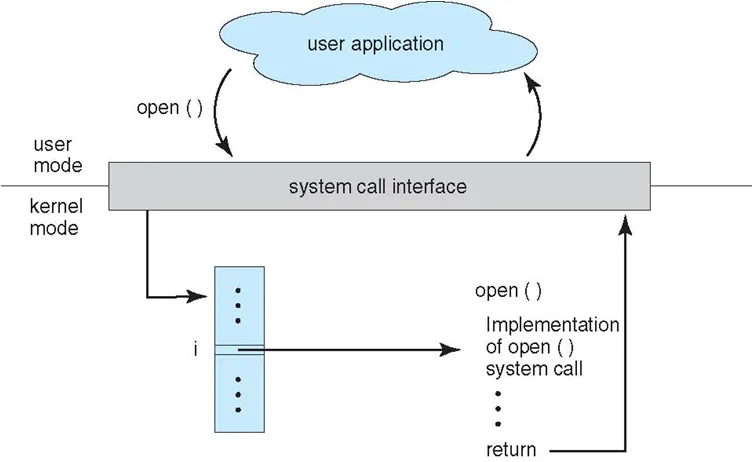
Here’s a visual explanation of the system call process:
“””
There are four general classes of system calls (tutorialspoint.com):
“””
Building on this, there are a few common scenarios that require system calls (asmtutor.com):
“””
“””
Now that we have a better understanding about what system calls are and how they’re implemented, let’s get to actually writing our assembly program:
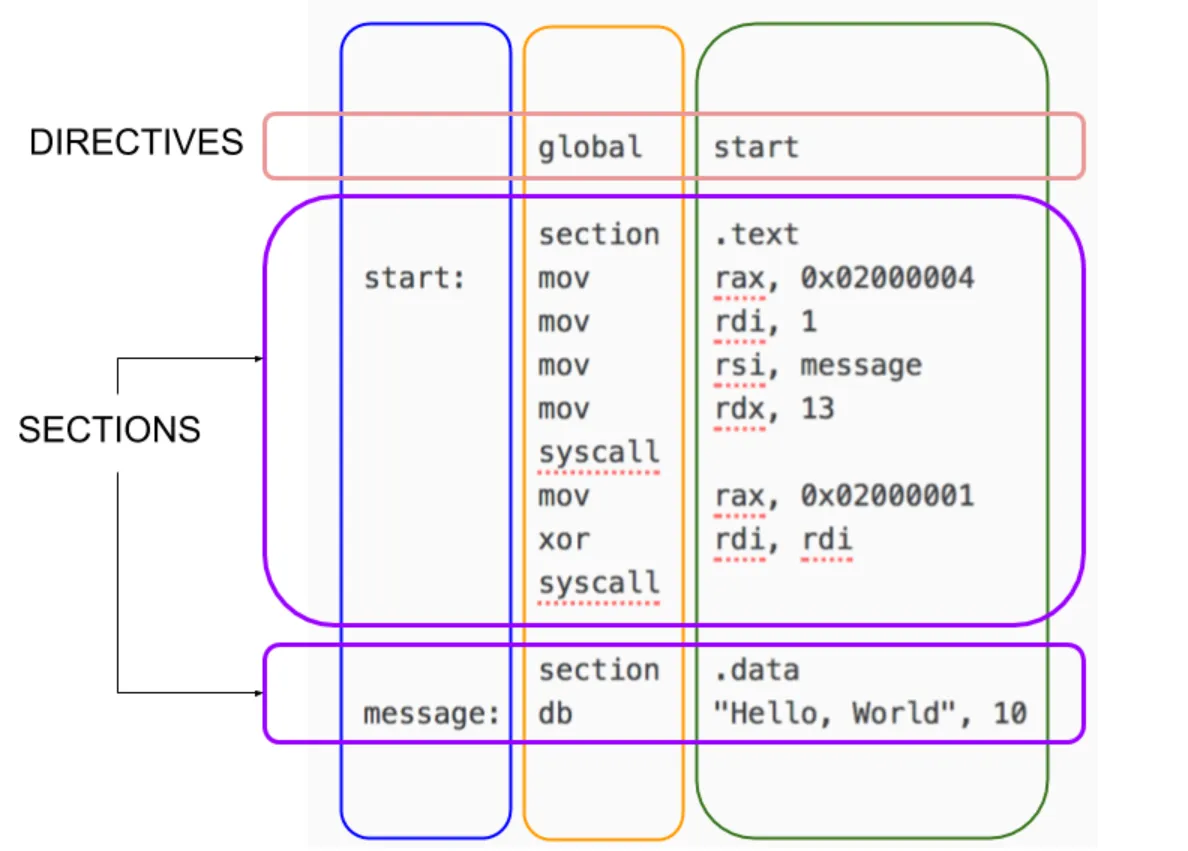
Here is a visual layout of an assembly program:
First we need to create a variable ‘msg’ in the .data section of our program and “assign to it the string we need to output,” (asmtutor.com). In our .text section we tell the kernel where to begin execution by “providing it with a global label _start: to denote the programs entry point,” (asmtutor.com).
We’re using sys_write to write our output to the console window. This function takes three arguments which are “sequentially loaded into EDX, ECX, and EBX before requesting a software interrupt which will perform the task,” (asmtutor.com):
In the end our final assembly program will look like:
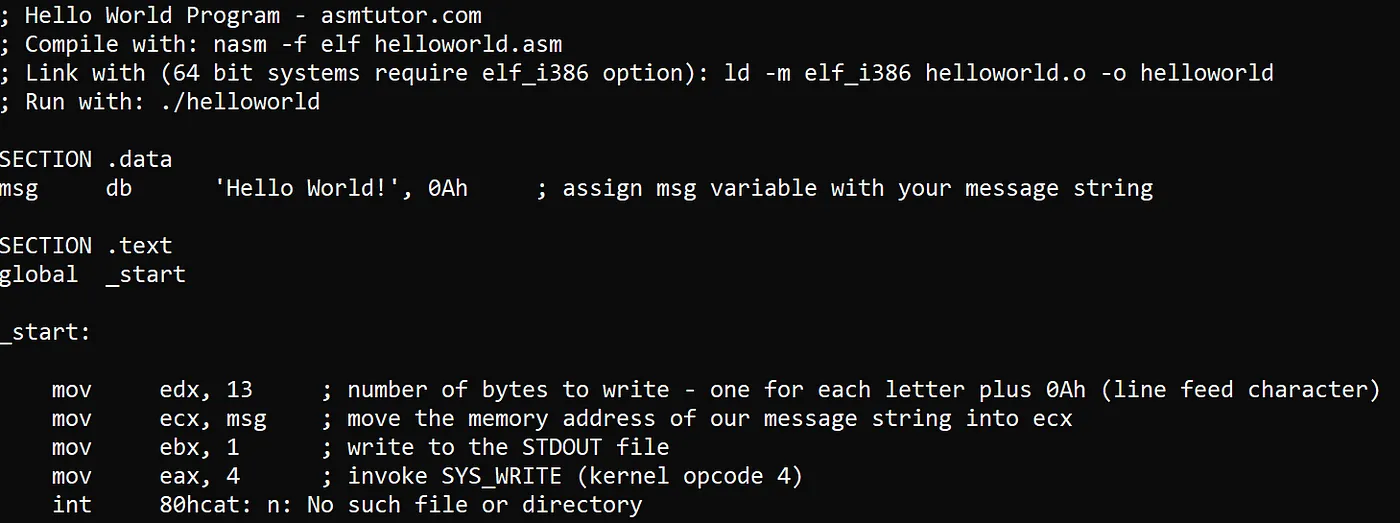
And when we compile and link it:

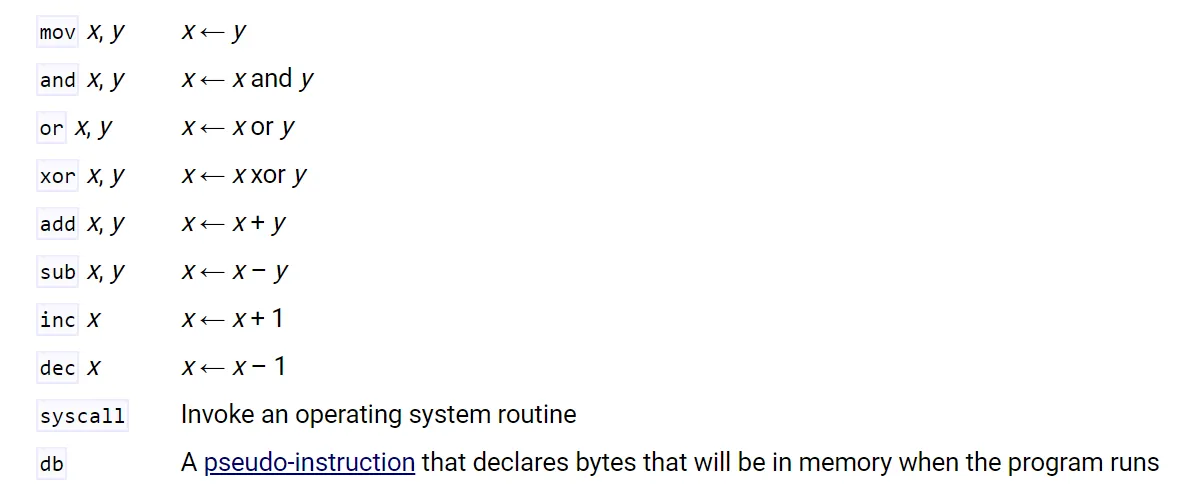
There are TONS of assembly instructions so asmtutor.com recommends that you at least familiarize yourself with the following common routines:
The “db” instruction initializes memory with the “Hello World!” string (keil.com). “0Ah” specifies how many bytes in memory that string will need.
Hopefully the reader has a better sense of the general structure of an assembly program and of the significance and process by which system calls are invoked.
Note: After writing one of my first assembly programs and running it with NASM, I was confused as to why we had to compile our assembly code. After all, in C programming, the compilation stage of the compilation process, translates source code into assembly. However, since we’re already in assembly, I wasn’t quite sure what compilation was actually doing. It turns out that “compilation” in the context of NASM means going from assembly instructions to binary (en.wikipedia.org). Once we’re in binary, the program can be linked and run.
The reader is probably also wondering why we received a segmentation fault when we ran our program. We will address that very question in our next tutorial.
As we are passionate about this industry, security and research comes as a second nature for us providing our customers with unmatched results. Let's get in touch!
